Facebook Timelines: The Benefits to Business Owners from a Personal Profile standpoint
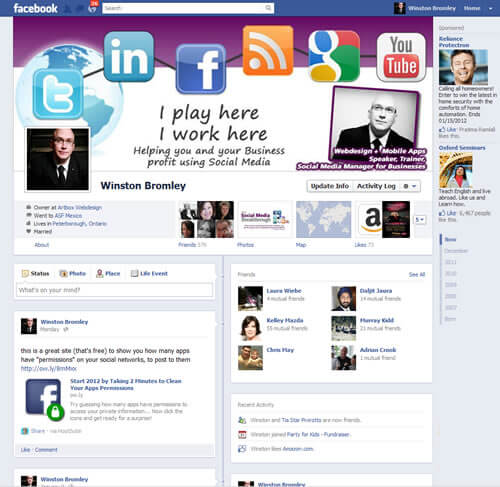
A few months ago, Facebook rolled out a Beta version (and now it’s a regular part of FACEBOOK) of what is called the Facebook Timeline. If you haven’t seen them yet, you can see an example at: http://www.facebook.com/winston.bromley
The Facebook Timelines are being pushed a lot these days and they have some really great benefits to a Business Owners if used correctly. As I teach at my online seminars or at live Events to Business owners like yourself, I always show how Social Media ties into your Business most effectively. After all, that is in the end why you are using Social Media in your Business – to create Engagement and in the end, make a profit from it.
Facebook Timeline is for personal profile pages only at the moment. They are not being rolled out yet for Business or Fan Pages.. so why am I writing about Facebook Timelines for personal pages?
The new Facebook Timeline is a PERFECT place to showcase what you do as a business owner as well as who you are a person. In the Timeline, there is a thing called Cover Banner, which is a 849 x 312 pixel cover image placed at the top of your profile which is a prime location for you and what you do.
Facebook is very strict on what you can post on these Facebook Timeline Covers Banners (as you see with mine: http://www.facebook.com/winston.bromley). You are not allowed to put up advertising banners or make it too salesy of what you do or only about your Business. The trick is to showcase yourself as a person AND as someone who can help others (in your Business)
Here are 3 main benefits to Facebook Timelines that you can get now:
- The ability to post a Cover Banner image that gives you a chance to personalize your profile as mentioned above showcasing your life and your Business. Don’t be too salesy….
- You can add in the Life Events that meant a lot to you, from the past, such as a wedding, a divorce (you never know what people will post on FB), a special event, etc. Right now the events fall in five categories – Work & Education, Family & Relationships, Home & Living, Health and Wellness, Travel and Experiences.Note: You can also add a year to your posts that will re-post a status in the year that that Event happened….even if you were not on Facebook at the time!… Such as pre-2003.
- By using the Life Events, you can showcase all your Talents that you did in the past such as organizing events or putting on Seminars. It can be a great tool for new job or career opportunities.
The Down Side
Right now, there are scammers are taking advantage of some users’ desire to revert back to the old profile and do away with the Timeline. Pages and apps have appeared that claim to be able to deactivate the Timeline and they ask users to click like buttons, share things with friends, etc.
The only thing they do is gain access to your Account and then Spam all your Friends, so don’t get involved with them.
Setup of a Facebook Timeline: Step by step
First off, to move over to a Facebook TIMELINE is now super easy, even for the non-techy people out there… and I know there are a few.
Version 1: Easy as pie, if you have a great Timeline image.
1. Go to http://www.facebook.com/about/timeline
2. Click on the button to the right that says “Get Timeline.” It’s now enabled, but not published yet.
3. Click “Publish Now.” You’re done.
Version 2: Easy setup with a few extra steps so you can preview what your Timeline page will look like
1. Log into your Facebook account and go to the About Timeline page at http://www.facebook.com/about/timeline
2. Click on “Get Timeline”
3. Scroll down on your new Timeline and remove or Edit any items that you don’t want shown. To do this, simply hold your cursor over the upper right of the item you want to edit, and pick a choice on the drop-down list.
4. From that drop down list, you can hide it from the timeline ,change the date of the item, add a location, or delete the post.
5. To“Feature” a post (as mentioned above), click on the star icon to the left of that pencil icon. This will make that item expand all the way across the page, so more people can see it
6. Once are done with all the edits, either go back to the top of your profile/Timeline page and click “Publish Now”. There is also an option that it will do the posting in 7 days.
As a side note; If you want to get a Custom Timeline Cover image created specific to your Brand, we can help you out. Email us at artbox@artbox.ca with the Subject Timeline Cover and we will get the process started.

